
Graduation Cap Tutorial & FREE Template!
- Amanda Hermans

- May 13, 2021
- 3 min read
Updated: Nov 5, 2021
May is a month of celebrations – May Day, Cinco de Mayo, Mother’s Day, Memorial Day, my dad’s birthday and many graduations. I also just recently learned that it is Asian and Pacific Islander Appreciation Month… who knew?! Anyway, with all of these reasons for celebrating I wanted to focus on a few creative ways to honor those we love. For instance, in the previous post I highlighted a simple Mother’s Day card tutorial that can be used for other happy occasions. Today, I want to share with you a lovely tutorial to honor the graduate in your life with a graduation cap filled with calligraphy lettering and flourishes, the perfect design for a hand-made card.

Here are the supplies needed:
· Cardstock (80 lb. or heavier) – Premade card and envelopes are easiest, but a standard piece of cardstock can be folded into a card.
· Calligraphy pen & nib (or use a micron pen for faux calligraphy)
· Micron pen or fine-liner pen – I like Micron pens because they are water resistant, but since watercolor is not being added to this card the type of pen is less important. Ball-point pens are not recommended as they tend to leave impression marks on the paper.
· Jar of water (if using a calligraphy pen)
· Black ink and gold ink (if using a calligraphy pen)
· Lint-free cloth (for cleaning nib if using a calligraphy pen)
· Pencil for sketching
· Eraser
Begin with drawing a pencil sketch of a graduation cap with words of celebration, name, date, school, special poem or Bible verse. Here is a line drawing to trace if you are short on time. Feel free to add your own personalization to it.
Complete the form below to receive your FREE template!
There are several ways to trace an image onto your paper. Here is a link to my previous post which details how to do that.
Once your pencil sketch is complete it’s time to add the ink. I’ve included two different methods depending on your tools you have available. First, I’ll share the “faux calligraphy” method.
Faux calligraphy is exactly what it sounds like: giving your handwriting the look of calligraphy lettering without using a calligraphy pen and nib to accomplish the effect. If you can write in cursive, you can write faux calligraphy. The key is to add thickened lines to all of the downstrokes. It’s as simple as that. Here are some examples:


Now it’s time to apply this technique to your graduation cap. Using the micron pen or fine-tipped black pen trace the words and flourishes. Then go back over to fill in the downstrokes of the words. The same method can be applied to the flourishes, remembering to only thicken the downstrokes.


The second option is to use a calligraphy pen and nib. Calligraphy pens are so much fun but can be a challenge if you’re just starting out. Be patient with yourself! Three keys to writing with a nib are pressure, angle and arm movement. First, pressure: looking closely at the nib and applying pressure to the tines, you’ll notice that they flex and spread open. This allows for the ink to flow thicker the more pressure is applied.

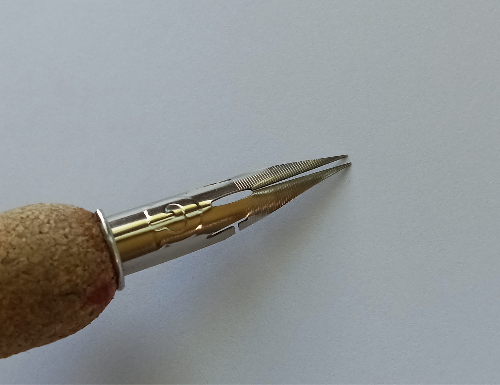
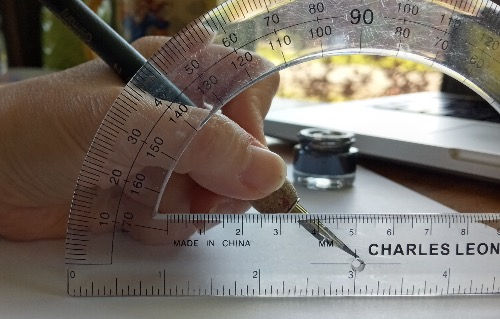
Second, angle: A 40 degree angle helps so that nib does not catch on the paper. If the nib is still catching decrease your angle. I am left-handed, but here are photos for each hand since most people are right-handed.

Lastly, arm movement: moving from the shoulder and not from the wrist creates a smooth, even stroke. Practice this movement by drawing circles in both directions, clock-wise and counter clock-wise.
Now, back to the project! Just as in faux calligraphy, the downstrokes are thicker, so when using a nib, apply more pressure to the downstrokes and lift pressure when doing upstrokes.


Finally add the gold ink to the tassel to add personality and contrast. If you do not have gold ink and would still like to add color, using the school color of your graduate works too. Use any medium that you prefer, such as watercolor, marker or colored pencil. Once completed, allow to dry.
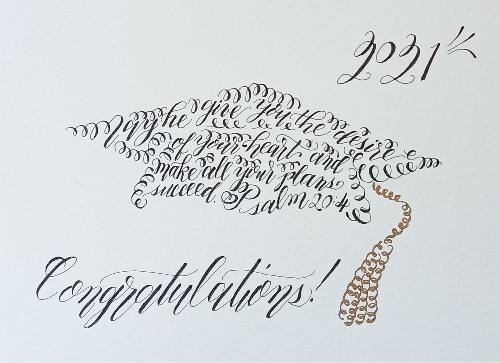
The card is ready to add a special message inside! This design could also be used to make a framed wall art design for your graduate. If you are able to follow this tutorial, I’d love to see your creation! Send me a quick message with a picture here! Enjoy!


Comments