
Easy Calligraphy Monogram Tutorial
- Amanda Hermans

- Sep 18, 2021
- 2 min read
Updated: Nov 12, 2021
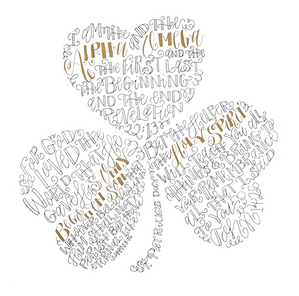
A couple of months ago, I had the privilege of teaching calligraphy at a local art center. One of the featured projects the students completed was a letter form with calligraphy and flourish accents. Below is the example I used in class.

Today, I want to share how to make your own custom letter design.
Supplies needed:
· Pencil and eraser
· Light table (Transfer paper or even a sunny window are good alternatives)
· Ink
· Water jar (jelly jar is great for this)
· Lint-free cloth (cloth napkin that will only be used for this purpose)
Begin with choosing a letter. In the class we focused on initials, whether it was the student’s first name or their family’s last name. I already had letters printed out for tracing, but letters can be easily found on the internet with a basic search for: letter outlines. I’ve also used the book, Decorative Alphabets and Initials edited by Alexander Nesbitt, which contains thousands of letterforms that are all copyright-free for artists and designers to use.

Once you have a letterform printed on copy paper, draw the interior design of your letter on your printed image. Ideas include: repeating name, flourishes, poem, verse, things that are special to you, etc. Be sure to fill in the letter to the edges of the outline and as completely as possible. I chose the letter H, the initial of friends' last name. Their last name, a verse, additional words and flourishes were included to fill in the letter.

Once you have completed your draft design, it’s time to lightly trace onto your final project paper. Transfer all of your design except for the letter outline. The shape of your letter will form based on the design that is inside. A sunny window, transfer paper or a light table will work to complete this step.

Using a kneadable eraser, be sure your pencil lines are as soft as possible. Once your pencil draft is ready, it’s time to apply the ink. With your dip pen, carefully trace the pencil lines. If you are right-handed, begin at the top left side of your letter. If you are left-handed, begin at the top right side of your letter. This will help avoid smudges of your hand in the wet ink. If needed, complete your project in sections.

This simple project can be used to design a greeting card, create unique art to hang on your wall or to give as a special gift. The possibilities are endless! I made this particular letter for friends who recently moved as a house-warming present to decorate their new walls.

This tutorial can be applied to shapes other than letters. I’ve designed animals, objects and even state and city maps. Here are some examples below. Prints are available for download at my etsy and spousely shops. I take requests and do custom designs as well.


Comments